The following article discusses "The Setup" and driving style for a Fray style T-jet at CRR and the proper cleaning technique for the Maxtrax racing surface.
The rails on a Maxtrax are made of a magnetic stainless steel. This has some advantages as the use of this type of steel means that the rails will not oxidize (e.g. rust) anywhere near as fast as conventional track. However, there is a downside. The rails act a bit differently than conventional steel rail and the pickups require a bit more tender loving care. The problem effects all cars but hits T-jets especially hard.
The Problem
The flow of electric current through the car causes an arc between the pickup shoes and the track. The arc follows the flow of current. The effect of the arc can be easily seen in the faster cats (i.e. Tyco, Super G+, Panther & Patriot). In these cars one pickup tends to wear much faster than the other. The other (non-wearing) pickup tends to pickup a white or gray deposit. I refer to these as the wear and burn side pickups. What is actually happening here is that the arc vaporizes a minute amount of metal and this metal is being transferred from the rail to the car on the burn side and from the car to the rail on the wear side
The material transmitted from the pickup to the track causes the wear. This pickup shoe rarely has problems as it is kept clean and it gets no deposit from the track. The burn side pickup is an entirely different story. On a conventional track, the deposit on the burn side pickup is white or a light gray and is conductive. On a Maxtrax the burn side deposit is black and is non-conductive. In other words, the burn side pickup tends to insulate itself as time goes on. Left uncontrolled, a T-jet will eventually stop as the buildup blocks the flow of current causing the car to initially cut out in certain track sections. Eventually the car will stop completely as the buildup totally blocks the flow of current. Cleaning helps but what really works is careful pickup tuning, polishing and coating the pickup after cleaning with an anti-oxidant.
Minimizing the Problem
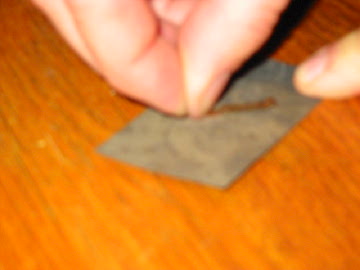
The problem can be sufficiently minimized so that it is not an issue. The pickup must first be adjusted so that it contacts the rail along its entire length. Not just at a point. This is not as easy as it sounds as some cars lift the front tires and ride the pickups down the straight. Careful observation and many minute adjustments are necessary to get the pickups tuned properly. My favorite tool for this is a small flat bladed screwdriver. I have found that a track section. a keen eye, a screwdriver and slight bit of pressure is all that is necessary to dial a fresh pair of pickups in. A pair of pliers is much too big of a weapon and can ruin a set of T-jet pickups so fast you just won't believe it.
I polish the pickups after tuning and periodically between races with 400 - 600 grit sandpaper. The polishing completely removes any small nicks resulting from the tuning process. Polishing also completely removes any oxidation.
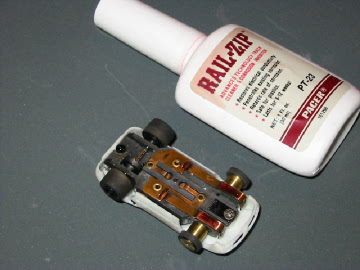
After polishing put a light coat of Rail Zip on the shoes and you are ready to go. Rail-Zip is a red anti-oxidant coating that was developed for the model railroad industry. They have a similar problem and these guys have developed a product that really works!
Clean the pickups after practice or after each heat or segment. If the buildup is heavy I have found that a drop of CRC 2-26 contact cleaner on the shoes before cleaning tends to break it up so it comes off easy. I use a battery powered Dremel with an abrasive rubber buffing wheel. I have found that wire brushes don't adequately remove the residue and that grinding stones are way too intense. A light buffing is all that is required. Grinding stones or engraving bits can wreck the tuning and create groves and places for the build up to occur. What works best is a well tuned, smooth, polished pickup.
After each race or practice session buff the pickups clean with the Dremel, reapply a light coat of Rail Zip and you are ready to go again.
Is all this really necessary? Before I found out how to prep the track and cars I could only turn 3-10 laps with some Fray cars between cleanings. My best cars would go 3-4 minutes but none of them would go a race distance without problems. I can now can run a T-jet 15-20 minutes without pickup problems. I personally don't clean the pickups after every segment. Now I lightly buff the pickups with the Dremel every other segment. After a race I first buff the pickups and then apply a coat of Rail Zip as described above.
CRR's T-Jet Setup
Every track has it's unique setup. The setup is that particular combination of tires, magnets, etc. that make the car work. What works at one track may not work elsewhere. Some T-jet tracks require a lot of handling as the car is constantly in a series of turns. Others require speed and brakes. A good combination of both is the best. CRR likes a car with big acceleration and brakes. Corning speed is important but not as significant as it is at some other tracks as CRR has a lot of 180 degree hairpins and, with the exception of the M&M turns, CRR is very much a timing track.
Any good low-low profile tire on 0.225" - 0.230" rims work well here. The Hobby Pro 0.177" "Tuff One" rear rims work well too.
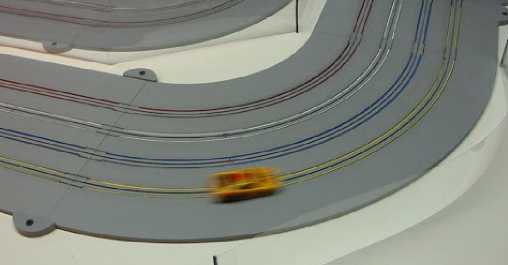
The trick at CRR is to pick up the timing and not overdrive the turns especially the M&M turns. If you get out of shape in the turns it looks fantastic but you actually slow down significantly. The following photo shows "Danger" Dan Rothwell making a perfect entrance to the last infield turn with his Pro T-Jet. The back end of Dan's Monte Carlo is very light under braking and is just about to step out. About this point in the turn Danger should blip the controller to set the rear end with a bit of power. This will stabilize the car, maximize the following very short straight and set the car up for the last hairpin.
If the car has good acceleration and brakes and is driven properly the times will come. I would recommend using an asymmetric front end as the different weight of the front wheels can help balance the car. Try a light wheel on the drivers side with a heavier wheel on the passenger side. Don't go too heavy on both sides as .flywheel effect of ultra-heavy front rims can significantly impact acceleration and braking. Use stock full copper pickup springs (not-squashed, cut or stretched) and tweak the motor brush contacts for max RPM. Hard front tires work well here as the track is smooth.
If your pickups are tuned right, CRR has a lot of power available. You have to use the power to go fast! Its where and how you go to max power that makes the lap. In the infield you come into the two 180 degree hairpins hard on the brakes. A lot of racers break each turn into three distinct phases These are: 1) Braking (done entirely in a straight line, 2) turning and 3) accelerating. This technique doesn't make for a fast lap time at CRR. The trick here is to brake and accelerate while the car is in the process of turning!. This shortens the braking zones considerably and cuts tenths off of the lap time. Throwing the car into the turn under braking will allow you to maximize the straight and will get the rear end to come out under braking (as opposed to having it come out under power). You then apply a bit of power to "Catch" the rear end and set the desired drift for the mid turn portion. This "Throw and Catch" technique can result in some really good times and is similar to doing a handbrake turn in a real car. Braking early and entering the turn under power is the slow way around CRR.
In the M&M turns you brake late as the first 45 degrees is a wider radius. Keep the car tidy through M&M's dual 180's. You can accelerate slightly for the last 45 and 90 degree turns as the radius widens for these corners. For the three hairpins brake late and "Throw and Catch" the car. The exit onto CRR's four long straights is done with the car just ever so slightly out of shape. Get on the power as soon as possible while still in the turn! This takes inches off of the turn and gets you going down the next straight that much sooner. When it’s time to go, hit it hard!
When done right, the car fishtails just a bit down the four straights. Too early and you either wildly snake down the straight (losing time), spin out or pull the pin out of the slot. The only disadvantage of having a light front end is that you can pull the pin out of the slot in the turns if you roll the power on a bit early. This is more than made up for by careful driving and the added performance of the lighter weight rims.
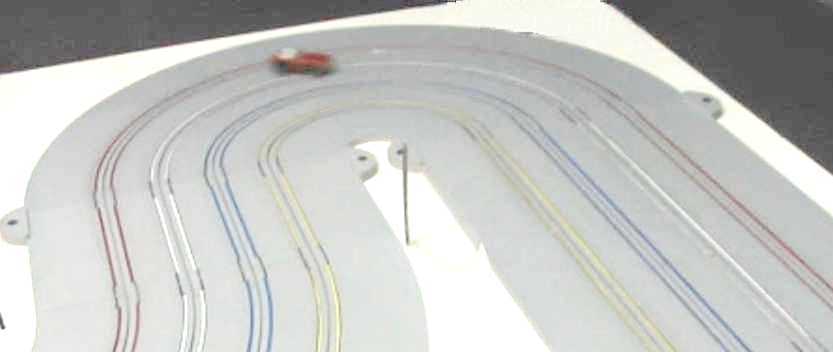
You can pick up time in the 90 degree turn that is the exit of the infield by giving the car a quick blip of power at the exit and immediately hitting the brakes to set the car for the final 180 degree hairpin. This photo, taken in practice for the "03' Turkey Trot" shows J.P. "Zipper" Duda in a nice drift in the last harpin. Zipper is back on the gas here and is in a perfect position to maximize the turn.
In my opinion, the car is a bit loose for a really fast lap time. However, the photo illustrates the "Throw and Catch" concept so incredibly well I just had to include it.
To set up for CRR, find the lane at home that has the most 6" hairpin turns and set up on it. Tune the car with the body screws till it’s not tight and behaves very nicely in the turns. You should be able to control the amount of oversteer with front rim weight and with 1/8 turn adjustments of the screws. The front screw should be a bit looser than the rear one. You should then be OK and ready to rock.
Cleaning Maxtrax
If you own a Maxtrax, what goes along with the above pickup tuning and cleaning is a careful track cleaning program. More about my program and how it evolved over time can be found here.
If you love racing T-jets and are considering buying a used or new Maxtrax I wouldn't give up on the track. The new Maxtrax's use carbon steel rail and the pickup problem is eliminated. Unfortunately, the consistent rail height that was a real positive of the stainless steel rail tracks is gone. Now the rail height appears to vary with the radius of the turn. That can be fixed with careful honing of the rails. With careful track assembly, pickup tuning and the above pickup and track cleaning regimes, the problem is very well under control and CRR is smooth, well built and a lot of fun to race on.
Steve "Maddman" Medanic